Overview
Introduction
Criteo serves personalized ads to mobile app users that have a high probability of clicking through and either installing your app or making an in-app purchase. Criteo technology is based on real-time product recommendation optimization and prediction engines.
In order to enable its technology, Criteo needs:
- App Events - App events and relevant data correctly captured on your mobile app
- Catalog Feed - A CSV or XML file (called a Catalog Feed) containing product information of a large portion of your mobile app’s offers
- (For Retargeting) Deeplink and Universal Link capability - Product level deep link capabilities in app to take users to the products they clicked on
About this Guide
This document provides detailed information on the following integration stages:
- App events and parameters
- Kochava dashboard configuration, including postbacks
- Generation of tracking links
- Catalog feed integration (for product-level ads)
- Deeplinking & Universal Linking (for Retargeting)
- Testing process
Integration Steps
The table below describes the steps to follow during this integration.
| Steps to Follow | Where to Integrate |
|---|---|
| Integration Questionnaire | Client |
| Integration Kickoff Call | Criteo & client technical teams |
| Dashboard Configuration | Client-side or (recommended) on call |
| (for product-level ads) Catalog Feed Integration | Criteo & client technical teams |
| (only if needed) Criteo Event Integration | Client-side |
| (only if needed) Testing events | Criteo & client technical teams |
| (only if needed) App Submission & Release | Client-side |
| Pre-Launch Checks | Criteo |
| Campaign Launch | Criteo (with client’s authorization) |
App Events & Data
If you already have Kochava events configured, please skip this section.
To integrate the Kochava SDK and events from scratch, or add additional ones, please expand this section.
Use the following code snippet at app launch: Below are examples of the different event types Criteo recommends that you integrate using the Kochava SDK: The Use the following code snippet to implement: The Use the following code snippet to implement: The Use the following code snippet to implement: The viewBasket event should be triggered on the basket-details pages. You must include the IDs, prices, and quantities of the basket’s products by the Event Items array. Note that viewBasket is not supported out of the box using Kochava’s SDK and must be implemented as a custom event. Use the following code snippet to implement: The Use the following code snippet to implement: The Use the following code snippet to implement: The Use the following code snippet to implement: The Use the following code snippet to implement:Expand
SDK Initialization
NSDictionary *identityLinkDictionary = [NSDictionary dictionaryWithObjectsAndKeys:
                                        @"TEST_USER_ID", @"myInternalUserID",
                                        @"1235467890123456", @"service ID",
                                        @"en", @"language",
                                        @"6589e68c2a242271e56710100222ff83", @"email_md5",
                                        nil];
NSDictionary *initDict = [NSDictionary dictionaryWithObjectsAndKeys:
                              @"REPLACE_WITH_YOUR_KOCHAVA_APP_ID", @"kochavaAppId",
                              @"USD", @"currency", // optional - usd is default
                              @"0", @"limitAdTracking", // optional - 0 is default
                              @"1", @"enableLogging", // optional - 0 is default
                              identityLinkDictionary, @"identityLink", // optional
                              nil];
kochavaTracker = [[KochavaTracker alloc] initKochavaWithParams:initDict];
Events Implementation in the App
Kochava event
Description
SessionBegin
App open / app brought to the foreground.
View Listing
View of a list of products.
View Product
View of a specific product.
View Basket
View of the shopping basket, or an addition made to it.
Purchase
Purchase of one or more products.
Level Achieved
User Level (for Gaming apps)
Status
User’s Subscription Status (i.e. subscriber, free, premium)
Achievement Unlocked
Major milestone reached within a game (for Gaming apps)
SessionBegin
sessionBegin event should be sent to Kochava with each new session, after Kochava SDK initialization. SessionBegin is a standard event supported by the Kochava SDK.[delegate.kochavaTracker trackEvent:@"SessionBegin":@"{}"];View Listing
viewListing event should be triggered on pages displaying product lists like a category page or a search results page. You should include in the array the IDs of the top 3 products (it’s fine to include more). These IDs must match to those passed in the catalog feed. Note that viewListing is not supported out of the box using Kochava’s SDK and must be implemented as a custom event.NSMutableDictionary * viewListing = [[NSMutableDictionary alloc] init];
[viewListing setObject:[NSArray arrayWithObjects:@"1", @"2", nil] forKey: @"product"];
jsonData = [NSJSONSerialization dataWithJSONObject:viewListing options:0 error:nil];
[delegate.kochavaTracker trackEvent: @"viewListing": [[NSString alloc] initWithData:jsonData encoding:NSUTF8StringEncoding]];View Product
View event should be triggered on all product details pages. You should include the ID of the product detailed on the page by the Event Item name, and send the Event Item with the event. It must be the same ID as used in the catalog feed, and must be unique. The Kochava event corresponding to the Criteo Event Type viewProduct is View. View is a standard event supported by the Kochava SDK.NSDictionary * viewProduct = @{@"product": @"1"};
jsonData = [NSJSONSerialization dataWithJSONObject:viewProduct options:0 error:nil];
[delegate.kochavaTracker trackEvent: @"View": [[NSString alloc] initWithData:jsonData encoding:NSUTF8StringEncoding]];View Basket
NSDictionary * viewBasket = @{
                @"currency": @"USD",
                @"product": @[
                    @{@"id": @"1",@"price": @"2.95",@"quantity": @"5"},
                    @{@"id": @"2",@"price": @"19.99",@"quantity": @"1"}
                ],
                @"din": @"2015-09-07",@"dout": @"2015-09-10" // optional for Travel, Hotel
            };

jsonData = [NSJSONSerialization dataWithJSONObject:viewBasket options:0 error:nil];
[delegate.kochavaTracker trackEvent: @"viewBasket": [[NSString alloc] initWithData:jsonData encoding:NSUTF8StringEncoding]];Purchase
Purchase event should be triggered on order confirmation pages. You should include a unique transaction ID and place the IDs, prices, and quantities of the products bought in the transaction into the Event Items array. Purchase is a standard event supported by the Kochava SDK.NSDictionary * trackTransaction = @{
@"nc": @"1",
@"id": @"someid",
@"currency": @"USD",
@"product": @[
@{@"id": @"1",@"price": @"2.95",@"quantity": @"5"},
@{@"id": @"2",@"price": @"19.99",@"quantity": @"1"}
],
@"din": @"2015-09-07",@"dout": @"2015-09-10" // optional for Travel, Hotel
};
jsonData = [NSJSONSerialization dataWithJSONObject:trackTransaction options:0 error:nil];
[delegate.kochavaTracker trackEvent: @"Purchase": [[NSString alloc] initWithData:jsonData encoding:NSUTF8StringEncoding]];Level Achieved
userLevel event allows Kochava to identify the highest level achieved by a user. This event is specific to Gaming vertical. It should be triggered every time the user levels up. userLevel is a standard event supported by the Kochava SDK.NSDictionary * userLevel = @{@"ui_level": 5};
jsonData = [NSJSONSerialization dataWithJSONObject:userLevel options:0 error:nil];
[delegate.kochavaTracker trackEvent: @"userLevel": [[NSString alloc] initWithData:jsonData encoding:NSUTF8StringEncoding]];Status
userStatus event allows Kochava to identify a user’s subscription status (free, subscriber, premium). This event should be triggered to initialize user’s status, and every time when user status changes. Note that userStatus is not supported out of the box using Kochava’s SDK and must be implemented as a custom event.NSDictionary * userStatus = @{@"ui_status": @"subscriber"};
jsonData = [NSJSONSerialization dataWithJSONObject:userStatus options:0 error:nil];
[delegate.kochavaTracker trackEvent: @"userStatus": [[NSString alloc] initWithData:jsonData encoding:NSUTF8StringEncoding]];Achievement Unlocked
achievementUnlocked event allows Kochava to identify wheter a user has reached a specific milestone within the game. achievementUnlocked is a standard event supported by the Kochava SDK.NSDictionary * userAchievement = @{@"ui_achievement": @"Gold_Medal"};
jsonData = [NSJSONSerialization dataWithJSONObject:userAchievement options:0 error:nil];
[delegate.kochavaTracker trackEvent: @"achievementUnlocked": [[NSString alloc] initWithData:jsonData encoding:NSUTF8StringEncoding]];
Hashed Email for Cross-Device Targeting (Recommended)
Clients have the option of sending Criteo the email address of app users when available. This will enable the cross-device Criteo targeting feature.
Expand
To generate an MD5 hash of an email address:
- Convert all characters to lower case
- Remove any blank spaces
- Convert to UTF-8
- Hash using MD5 algorithm
The email can be sent to Criteo by associating with the identity link during SDK initialization.
Use the following code snippet below as an example on sending MD5 hashed email.
kTracker = new Feature(getApplicationContext(), datamap);
NSDictionary *identityLinkDictionary = [NSDictionary dictionaryWithObjectsAndKeys:
                          @"CriteoKochavaTest", @"myInternalUserID",
                          @"1235467890123456", @"service ID",
                          @"en", @"language",
                          @"6589e68c2a242271e56710100222ff83", @"email_md5",
                          nil];

NSDictionary *initDict = [NSDictionary dictionaryWithObjectsAndKeys:
                          @"komobile-in--app-events5565020f2e19b",
                          @"kochavaAppId",
                          @"USD", @"currency", // optional - usd is default
                          @"0", @"limitAdTracking", // optional - 0 is default
                          @"1", @"enableLogging", // optional - 0 is default
                          identityLinkDictionary, @"identityLink",
                          nil];
Kochava’s SDK also allows client apps an option to send email in clear text. Kochava servers generate MD5 hash of this email address before forwarding it to Criteo.
Use the following code snippet as an example of how to send raw email addresses:
kTracker = new Feature(getApplicationContext(), datamap);
NSDictionary *identityLinkDictionary = [NSDictionary dictionaryWithObjectsAndKeys:
                          @"CriteoKochavaTest", @"myInternalUserID",
                          @"1235467890123456", @"service ID",
                          @"en", @"language",
                          @"kochava_ios@criteo.com", @"email_raw",
                          nil];

NSDictionary *initDict = [NSDictionary dictionaryWithObjectsAndKeys:
                          @"komobile-in--app-events5565020f2e19b",
                          @"kochavaAppId",
                          @"USD", @"currency", // optional - usd is default
                          @"0", @"limitAdTracking", // optional - 0 is default
                          @"1", @"enableLogging", // optional - 0 is default
                          identityLinkDictionary, @"identityLink",
                          nil];
Kochava Dashboard Configuration
Adding the ‘Criteo New’ Publisher Network
To add ‘Criteo New’ as a partner on Kochava’s dashboard:
- Login to Kochava Dashboard.
- Select the App
- Under the left menu bar, click the Partner Configuration tab, and then click Add Configuration button.
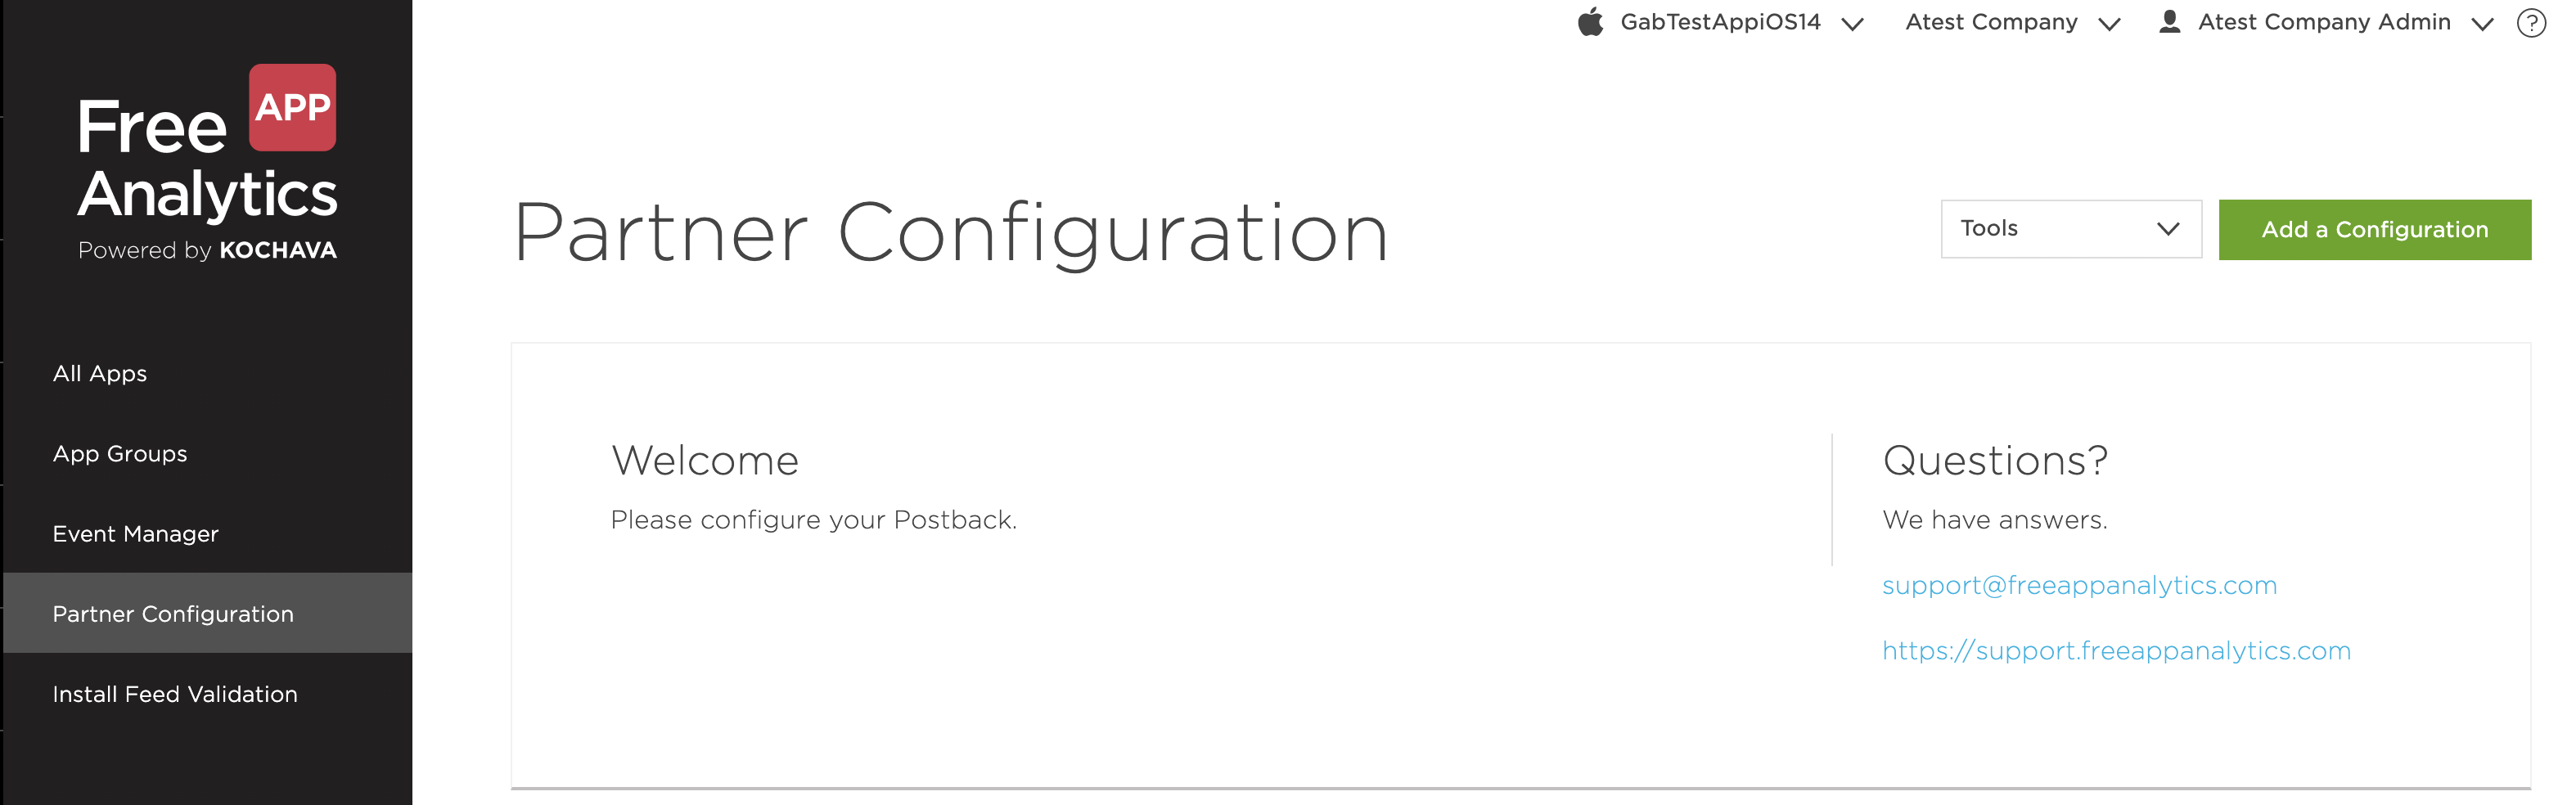
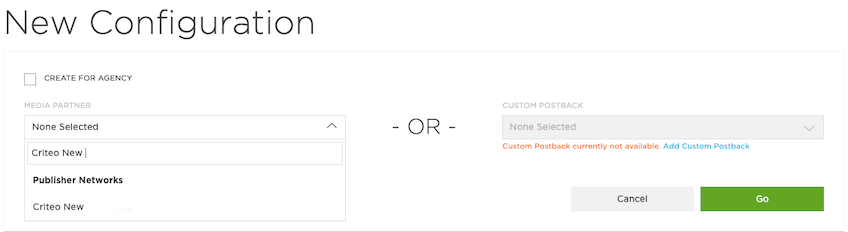
Finally, input 'Criteo New' into the Media Partner text field and select the 'Criteo New' publisher network option when it appears below the text field. To save Criteo as a partner, click on the Go button.
Configuring Criteo Postbacks
Once the partner is configured, postbacks can be setup for each event type.
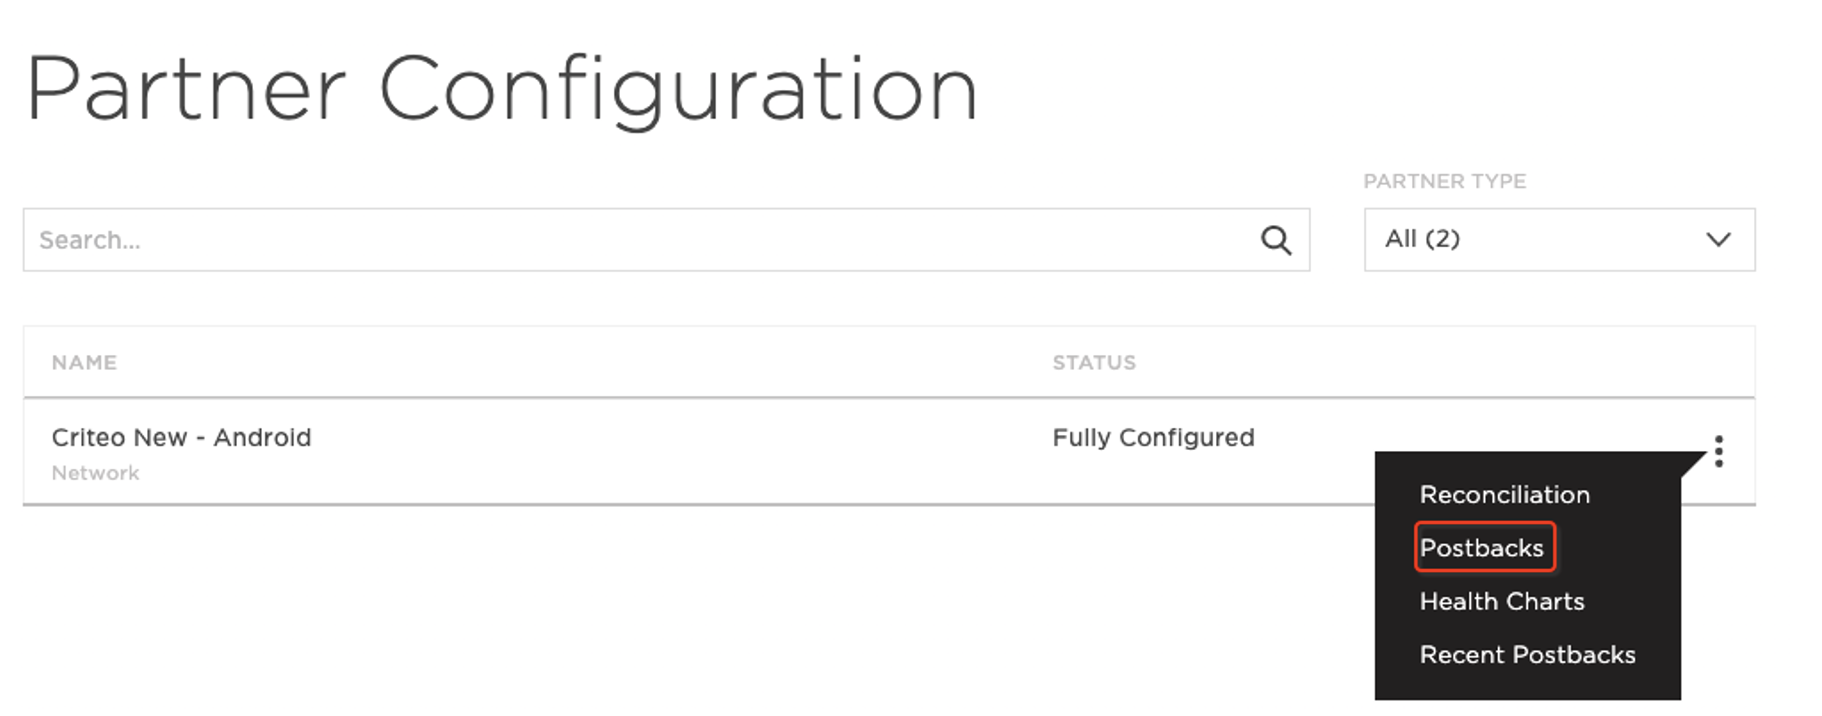
Open the ‘Criteo New’ module’s menu and click Postbacks
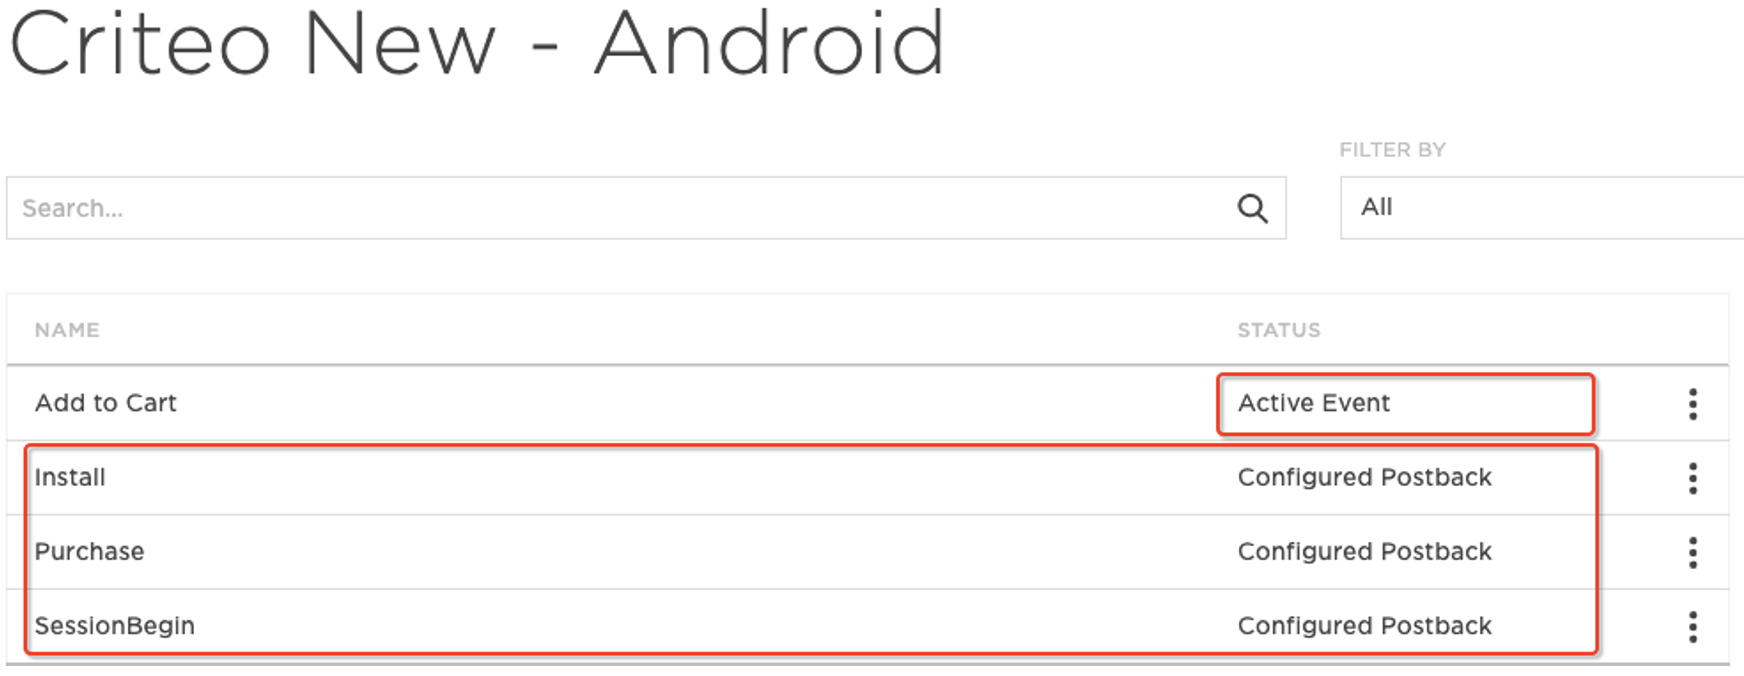
Install is automatically listed and its status is Configured postback, however it still needs additional setup (please see step 4 below for details). SessionBegin and the other post install events will be listed once received by Kochava. All the events (except install) are initially in status Active Event, meaning the postback is available but is not sending to Criteo yet. Once a postback is configured its Status becomes Configured postback.
On the menu on the next to the event select Create.
The postbacks need to configured for: Install, SessionBegin, and all other relevant events available for the campaign such as post-install KPI events.
For Retargeting, it’s highly recommended to also postback the key stages of the purchase funnel (for a retail app this would be events similar to SessionBegin, Search/Category Results, Item Details, Basket Add/View, Purchase Confirmation).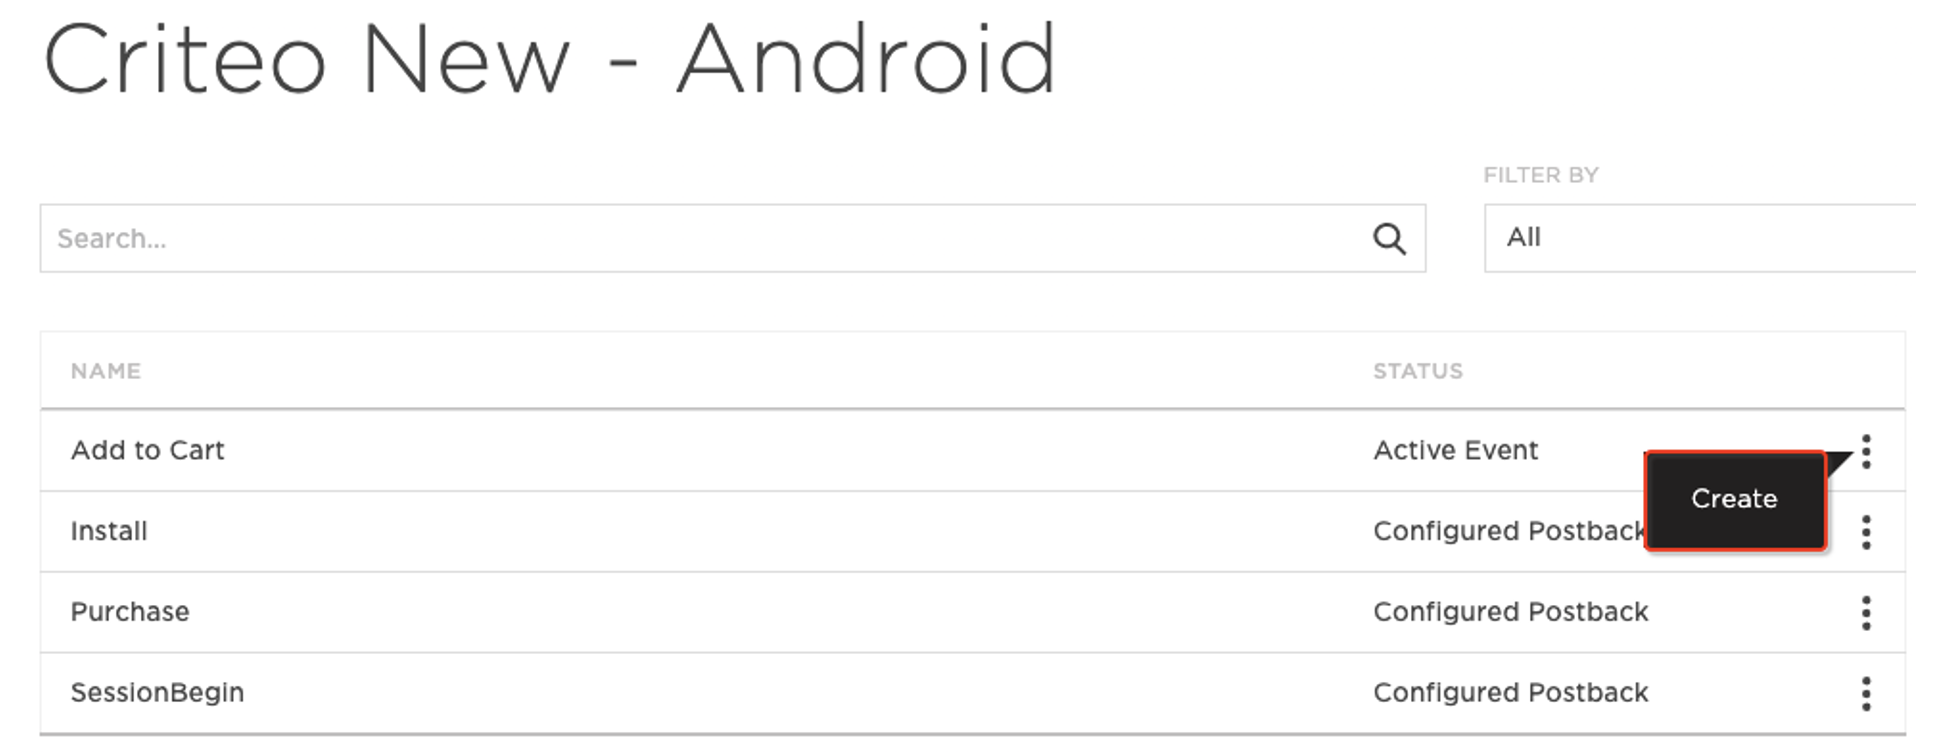
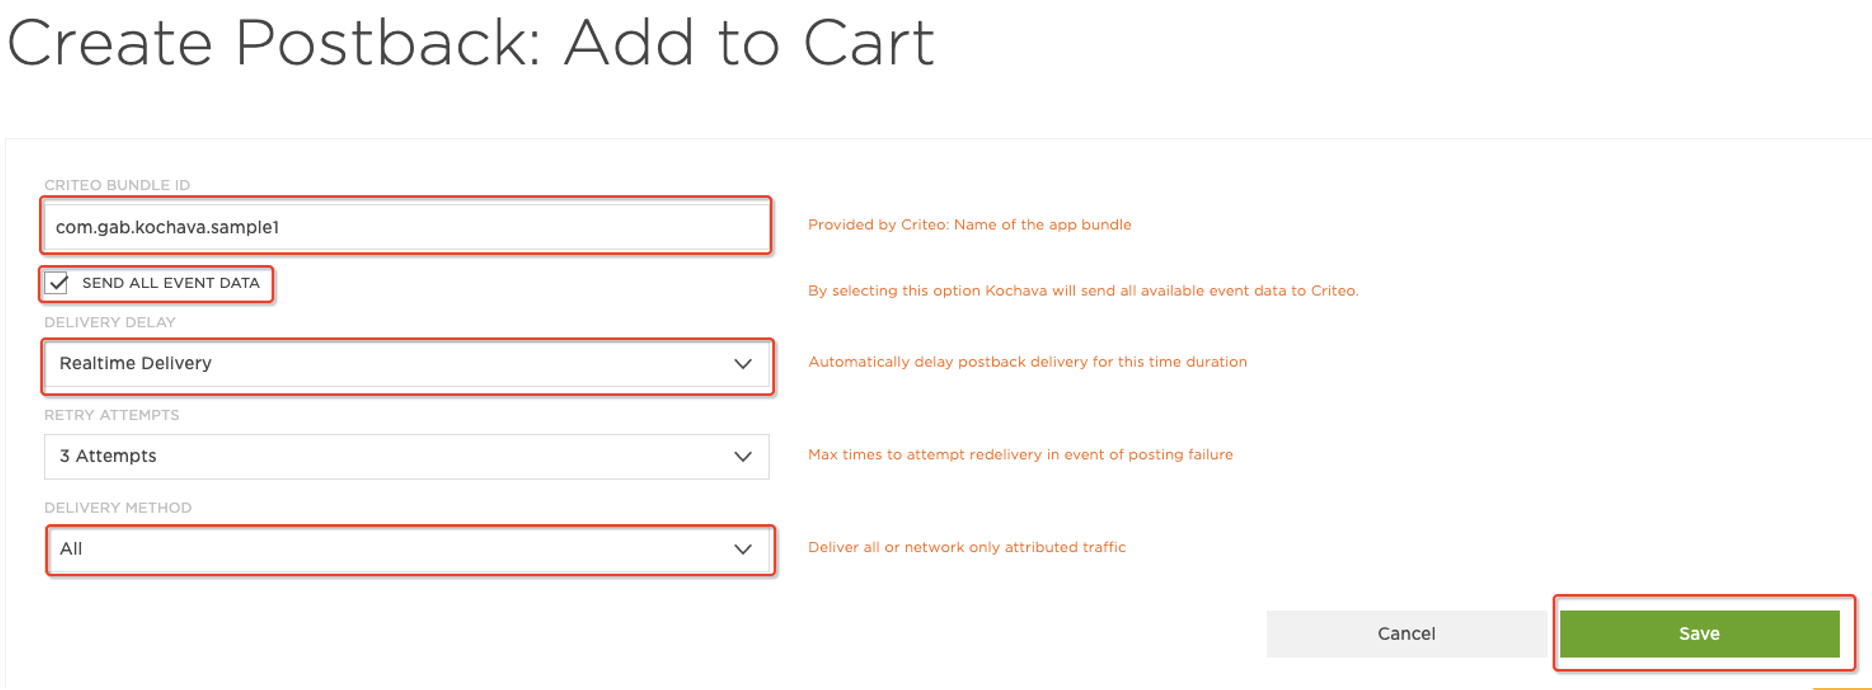
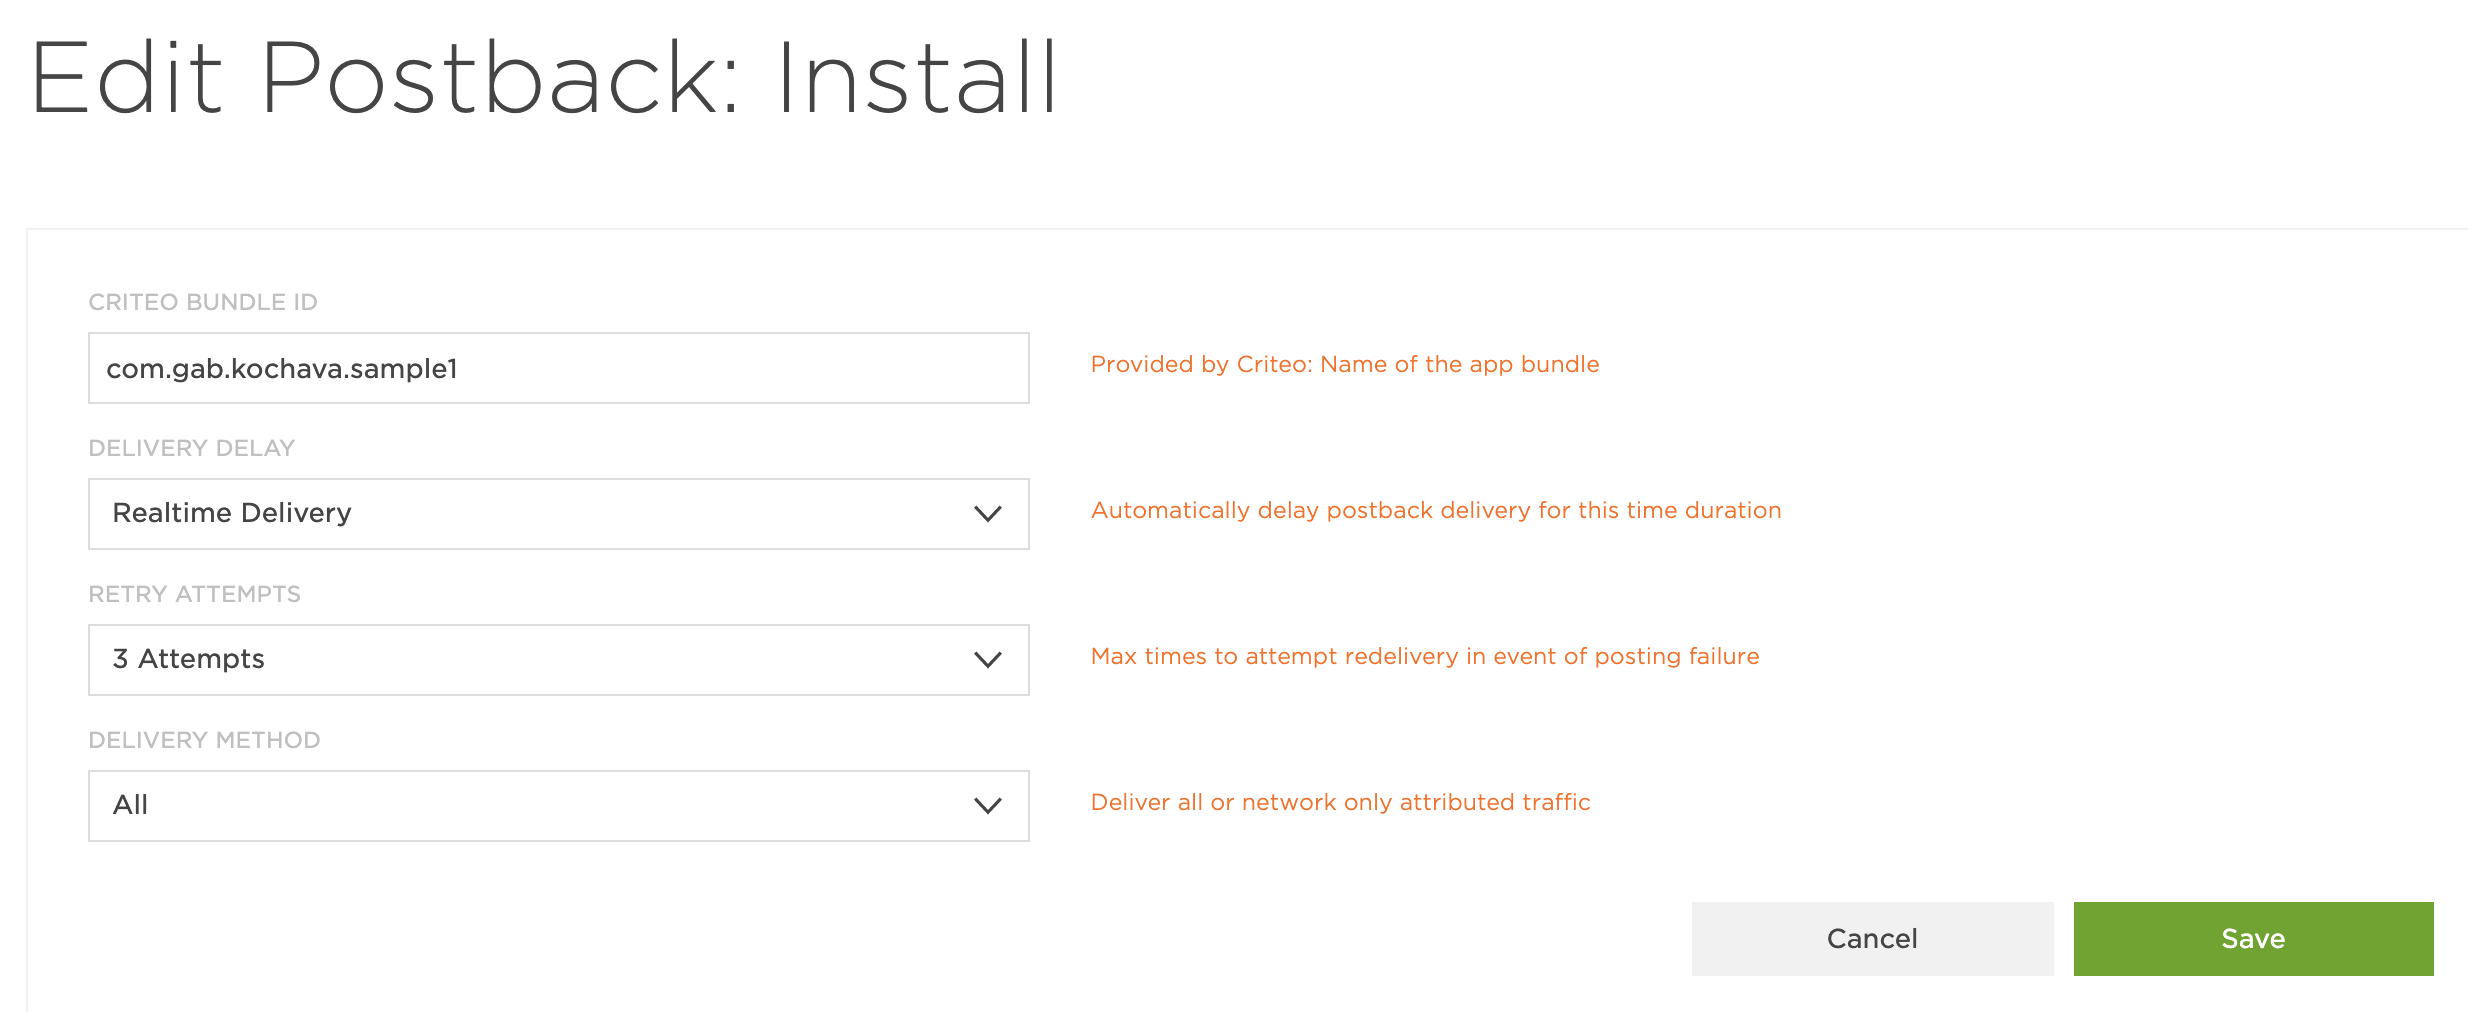
All the following settings are required for postbacks to function well:
CRITEO BUNDLE ID: Unique bundle ID of the app (this uniquely identifies the app to Criteo)
SEND ALL EVENT DATA: Check the box to send all data to Criteo. Essential for harnessing Criteo’s machine learning at its full potential (both user bidding and product recommendation), and useful for other use casees such as audience segmentation and custom reporting.
DELIVERY DELAY: Select Realtime Delivery
DELIVERY METHOD: Select All to send attributed, unattributed and organic events to Criteo. Essential for the same machine learning purposes mentioned above, and also to better suppress installed users from your App Install campaigns.
Then, click Save.
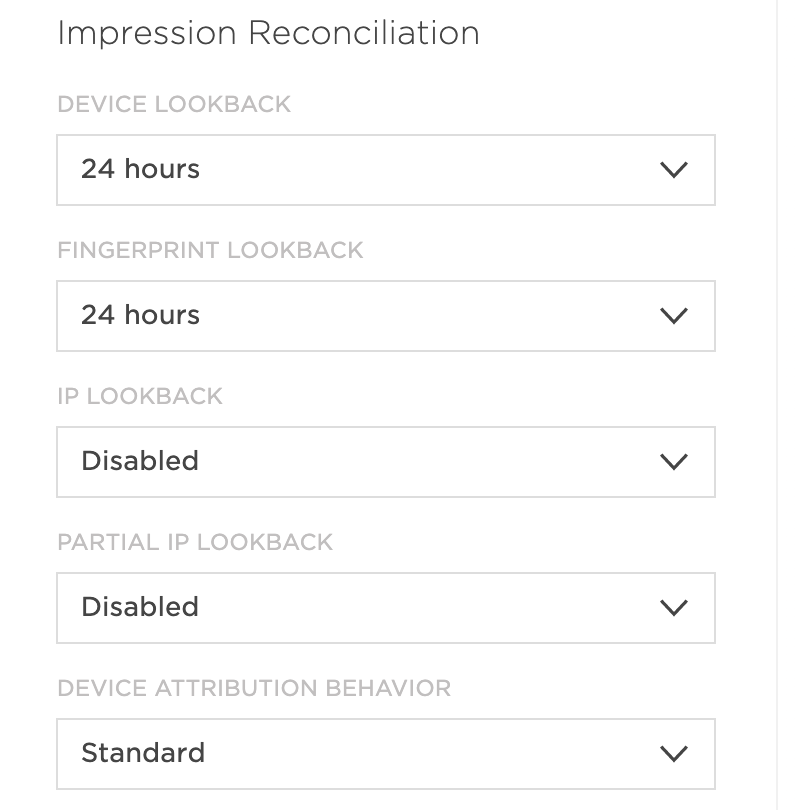
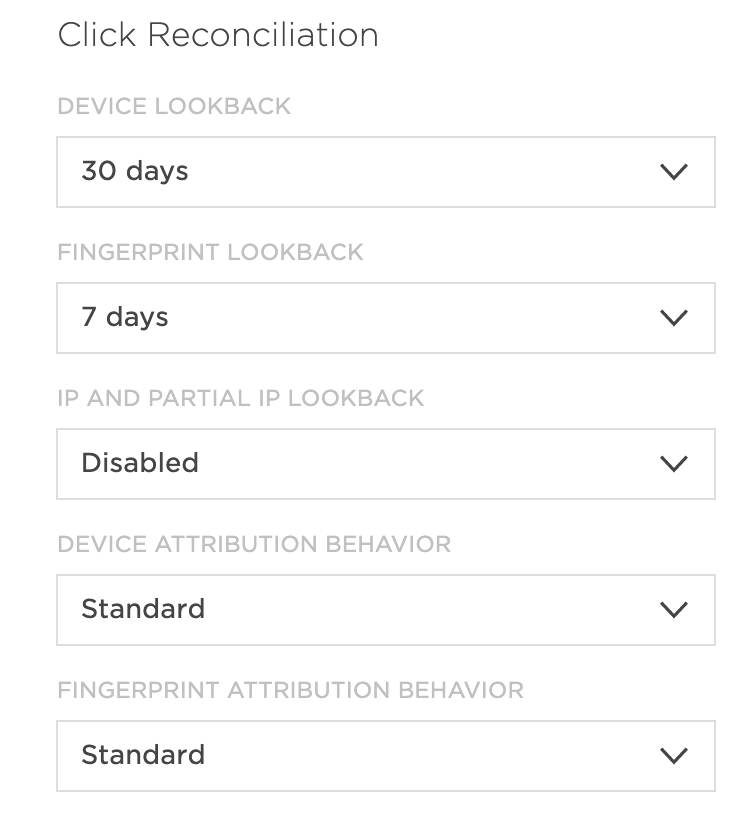
Attribution Settings - Partner Level
- Select Apps & Assets
- Select Partner Configuration
- To the right of ‘Criteo New - iOS’, select the three-dots menu
- Select Reconciliation
Configure the windows below according to your attribution model, or these suggested defaults:
Tracking Links
Install Tracking
Click to Expand
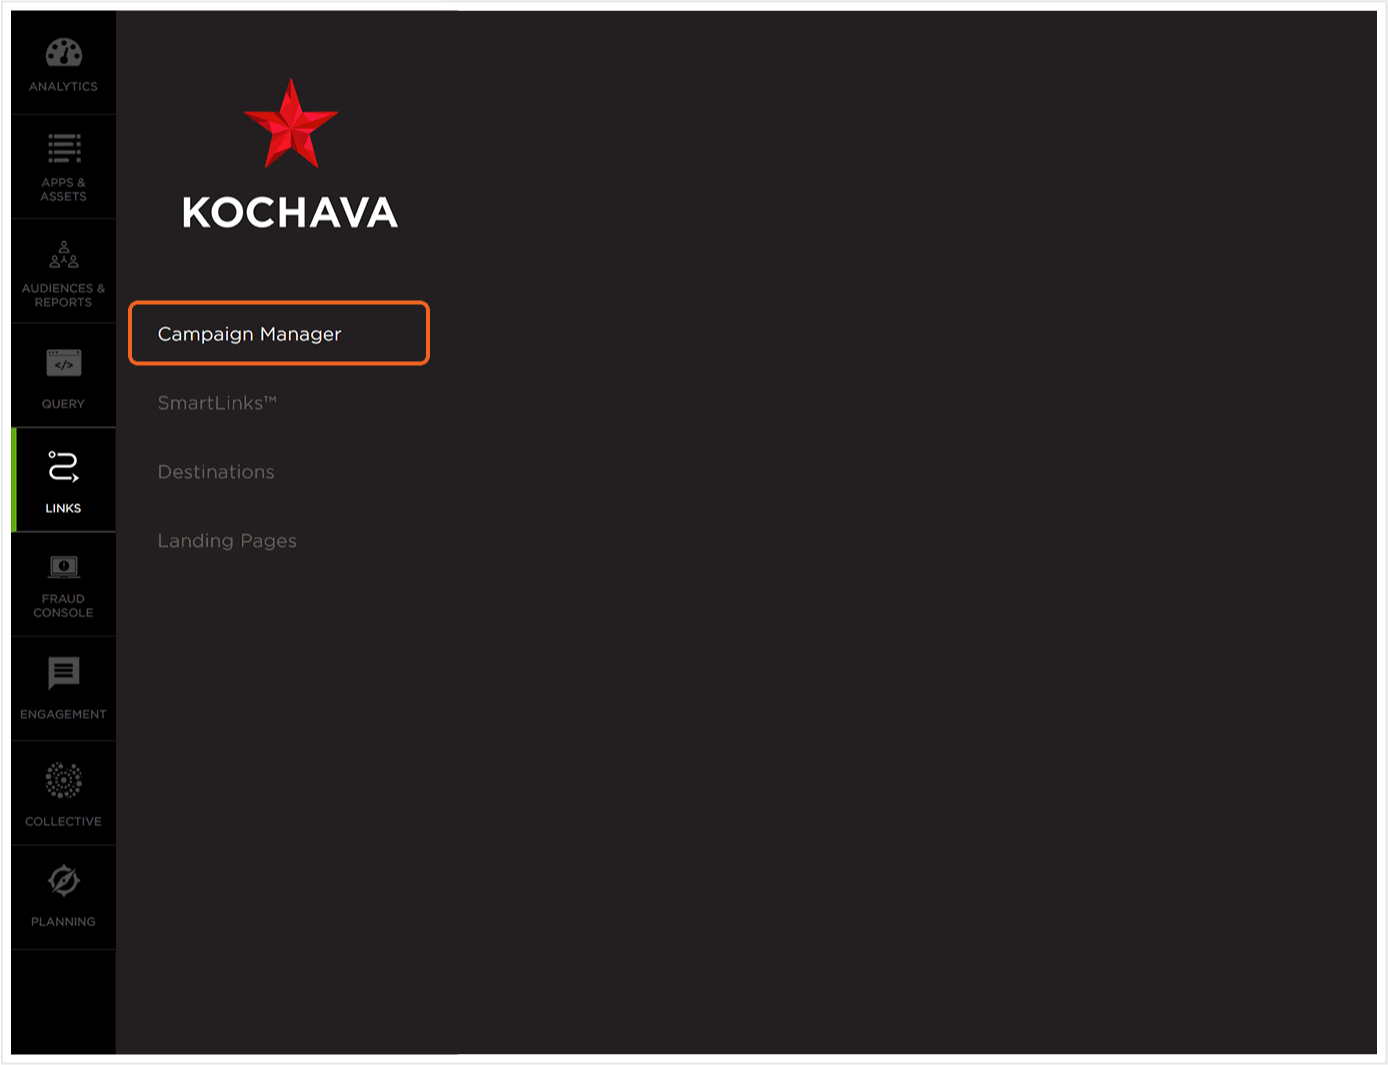
Go to Campaign Manager
- Log in to Kochava.
- Select the desired Account and App.
- Select Links > Campaign Manager.
Add tracking to the campaign
- Click Add a Tracker or Select Segment > Add a Tracker.

Set the tracking
Required:- Select Campaign
- Select Segment
- Set Tracker Name
- Select Tracker type Acquisition
- Select Criteo Criteo New - iOS
- Important: all new integrations (and re-launches) must use the ‘Criteo New’ integration
- Check the box for Share with publisher
- Set destination URL: Custom / Landing page / Google Referrer

Optional: Agency
* utm parameters
* Custom parameters
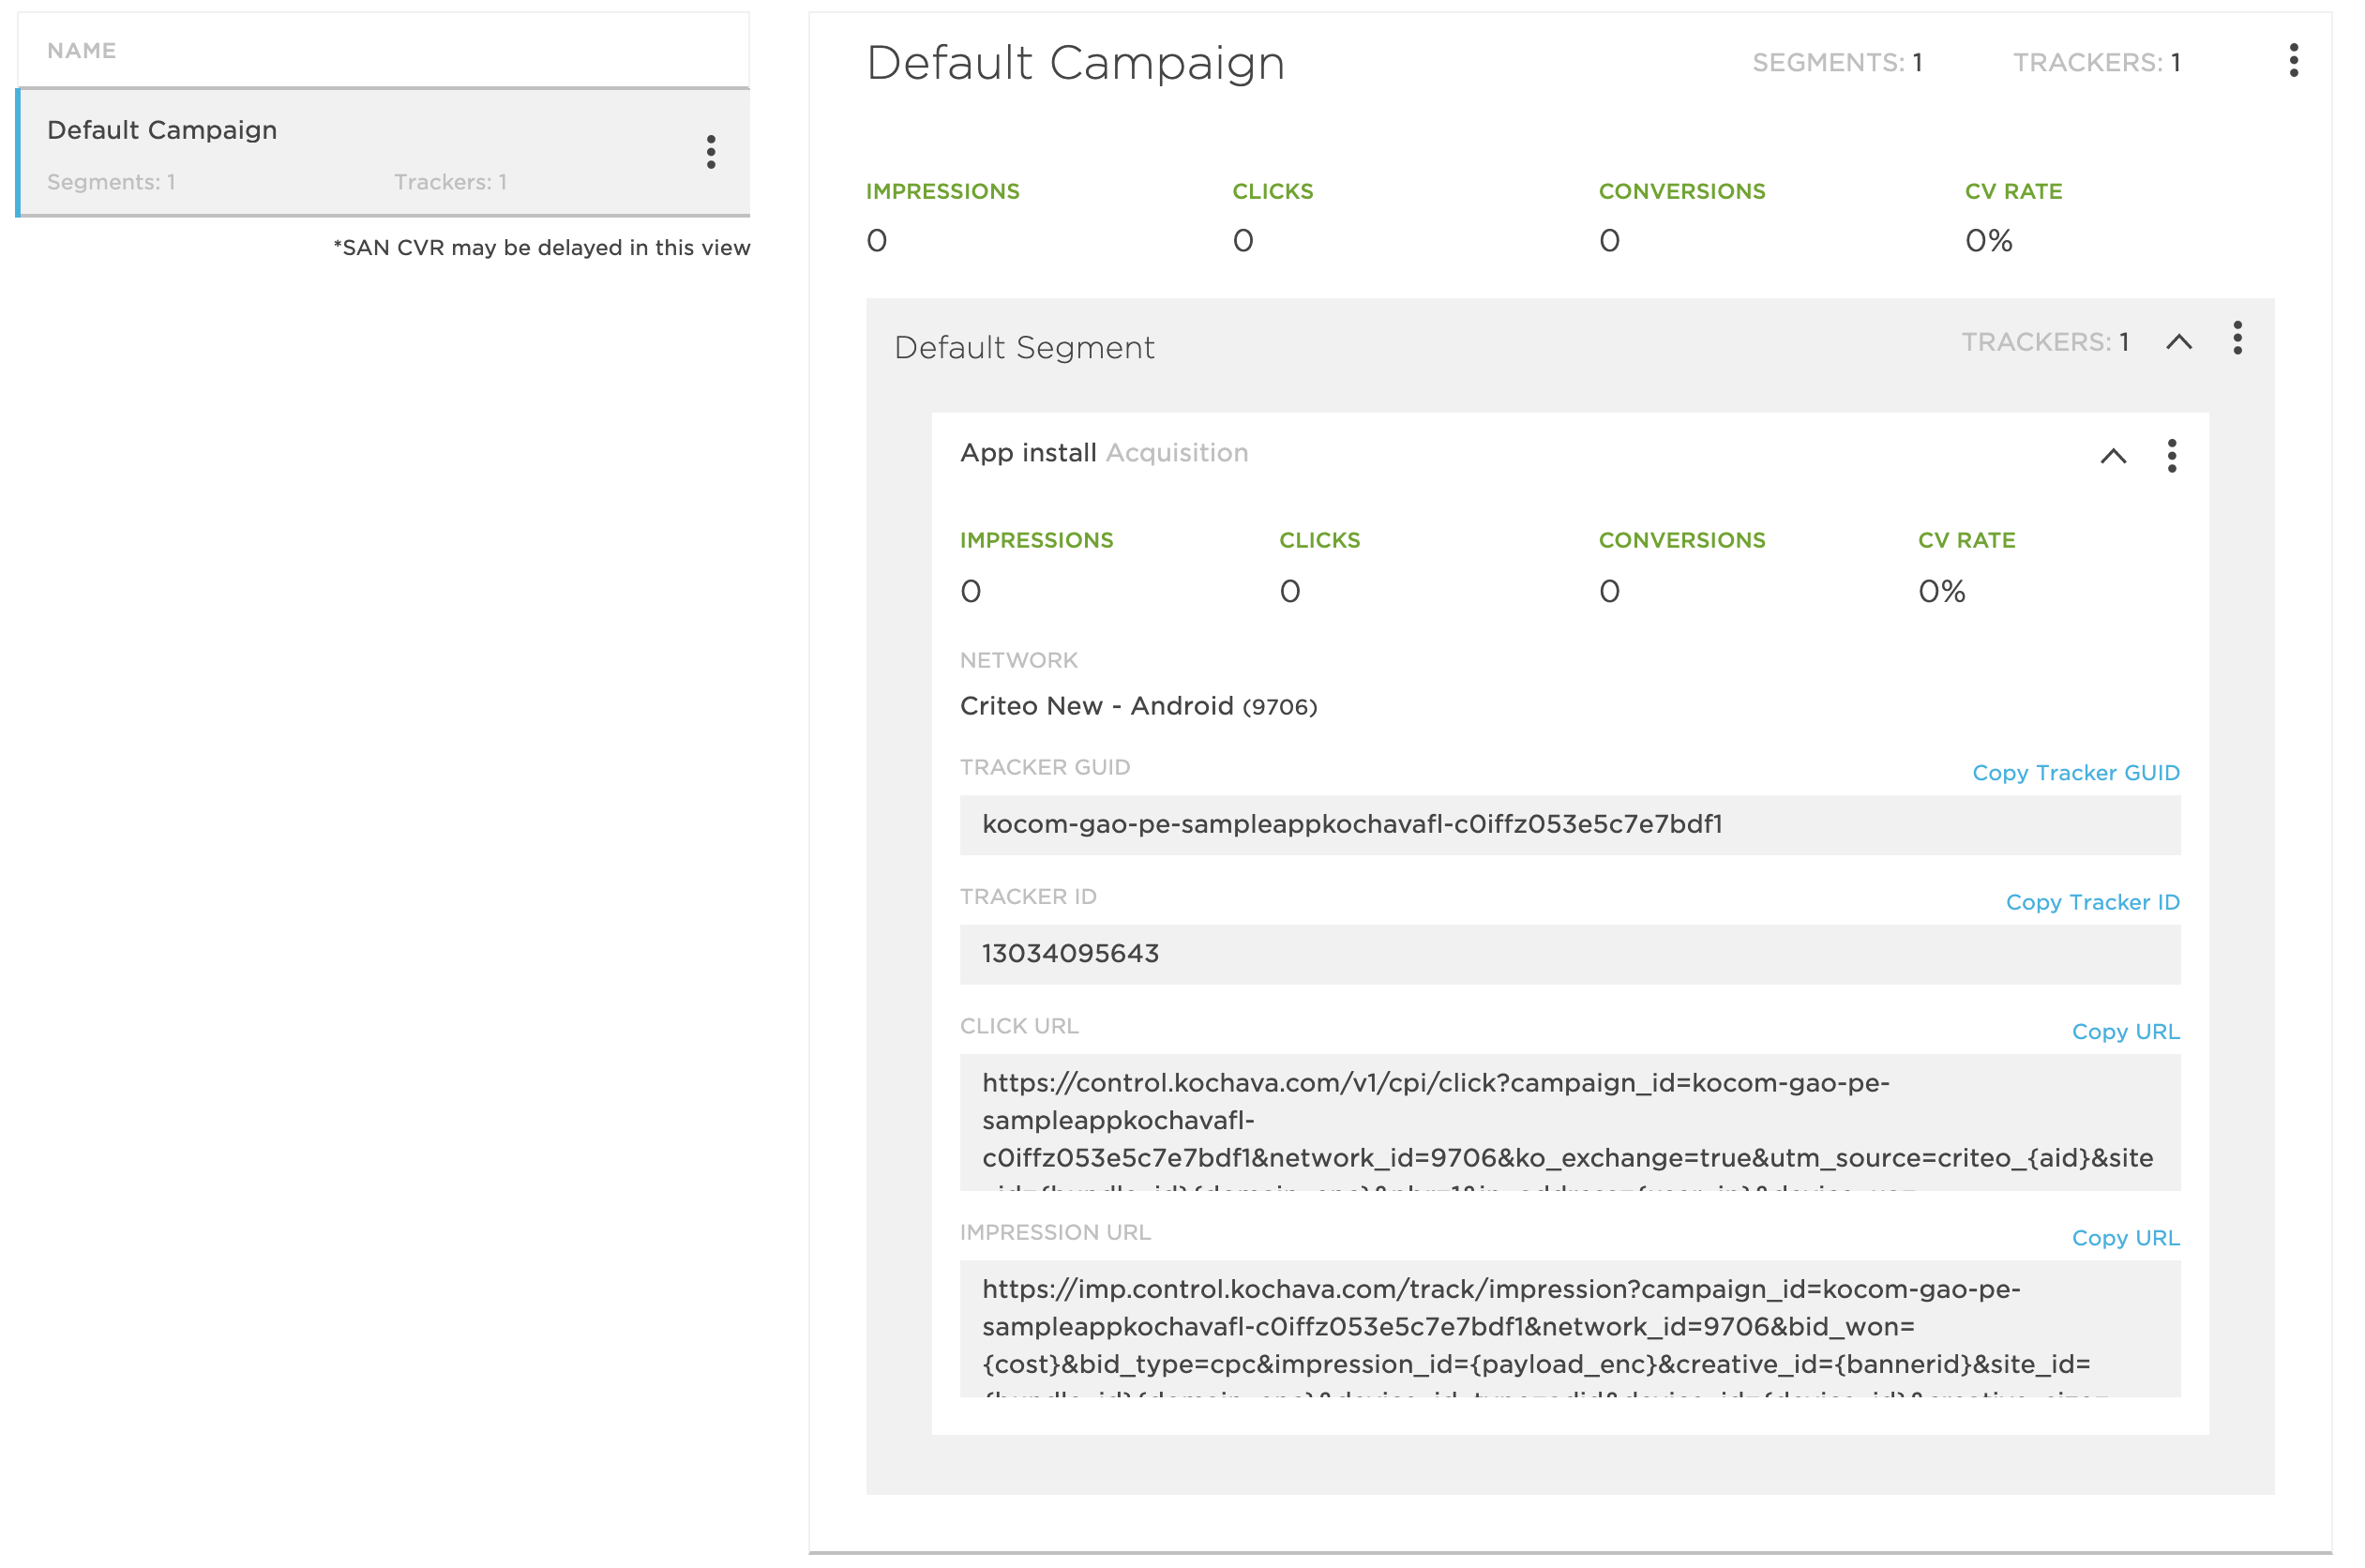
* PricingCopy Click URL and Impression URL
Retargeting Tracking
Click to Expand
Go to Campaign Manager
- Log in to Kochava.
- Select the desired Account and App.
- Select Links > Campaign Manager.
Add tracking to the campaign
- Click Add a Tracker or Select Segment > Add a Tracker.

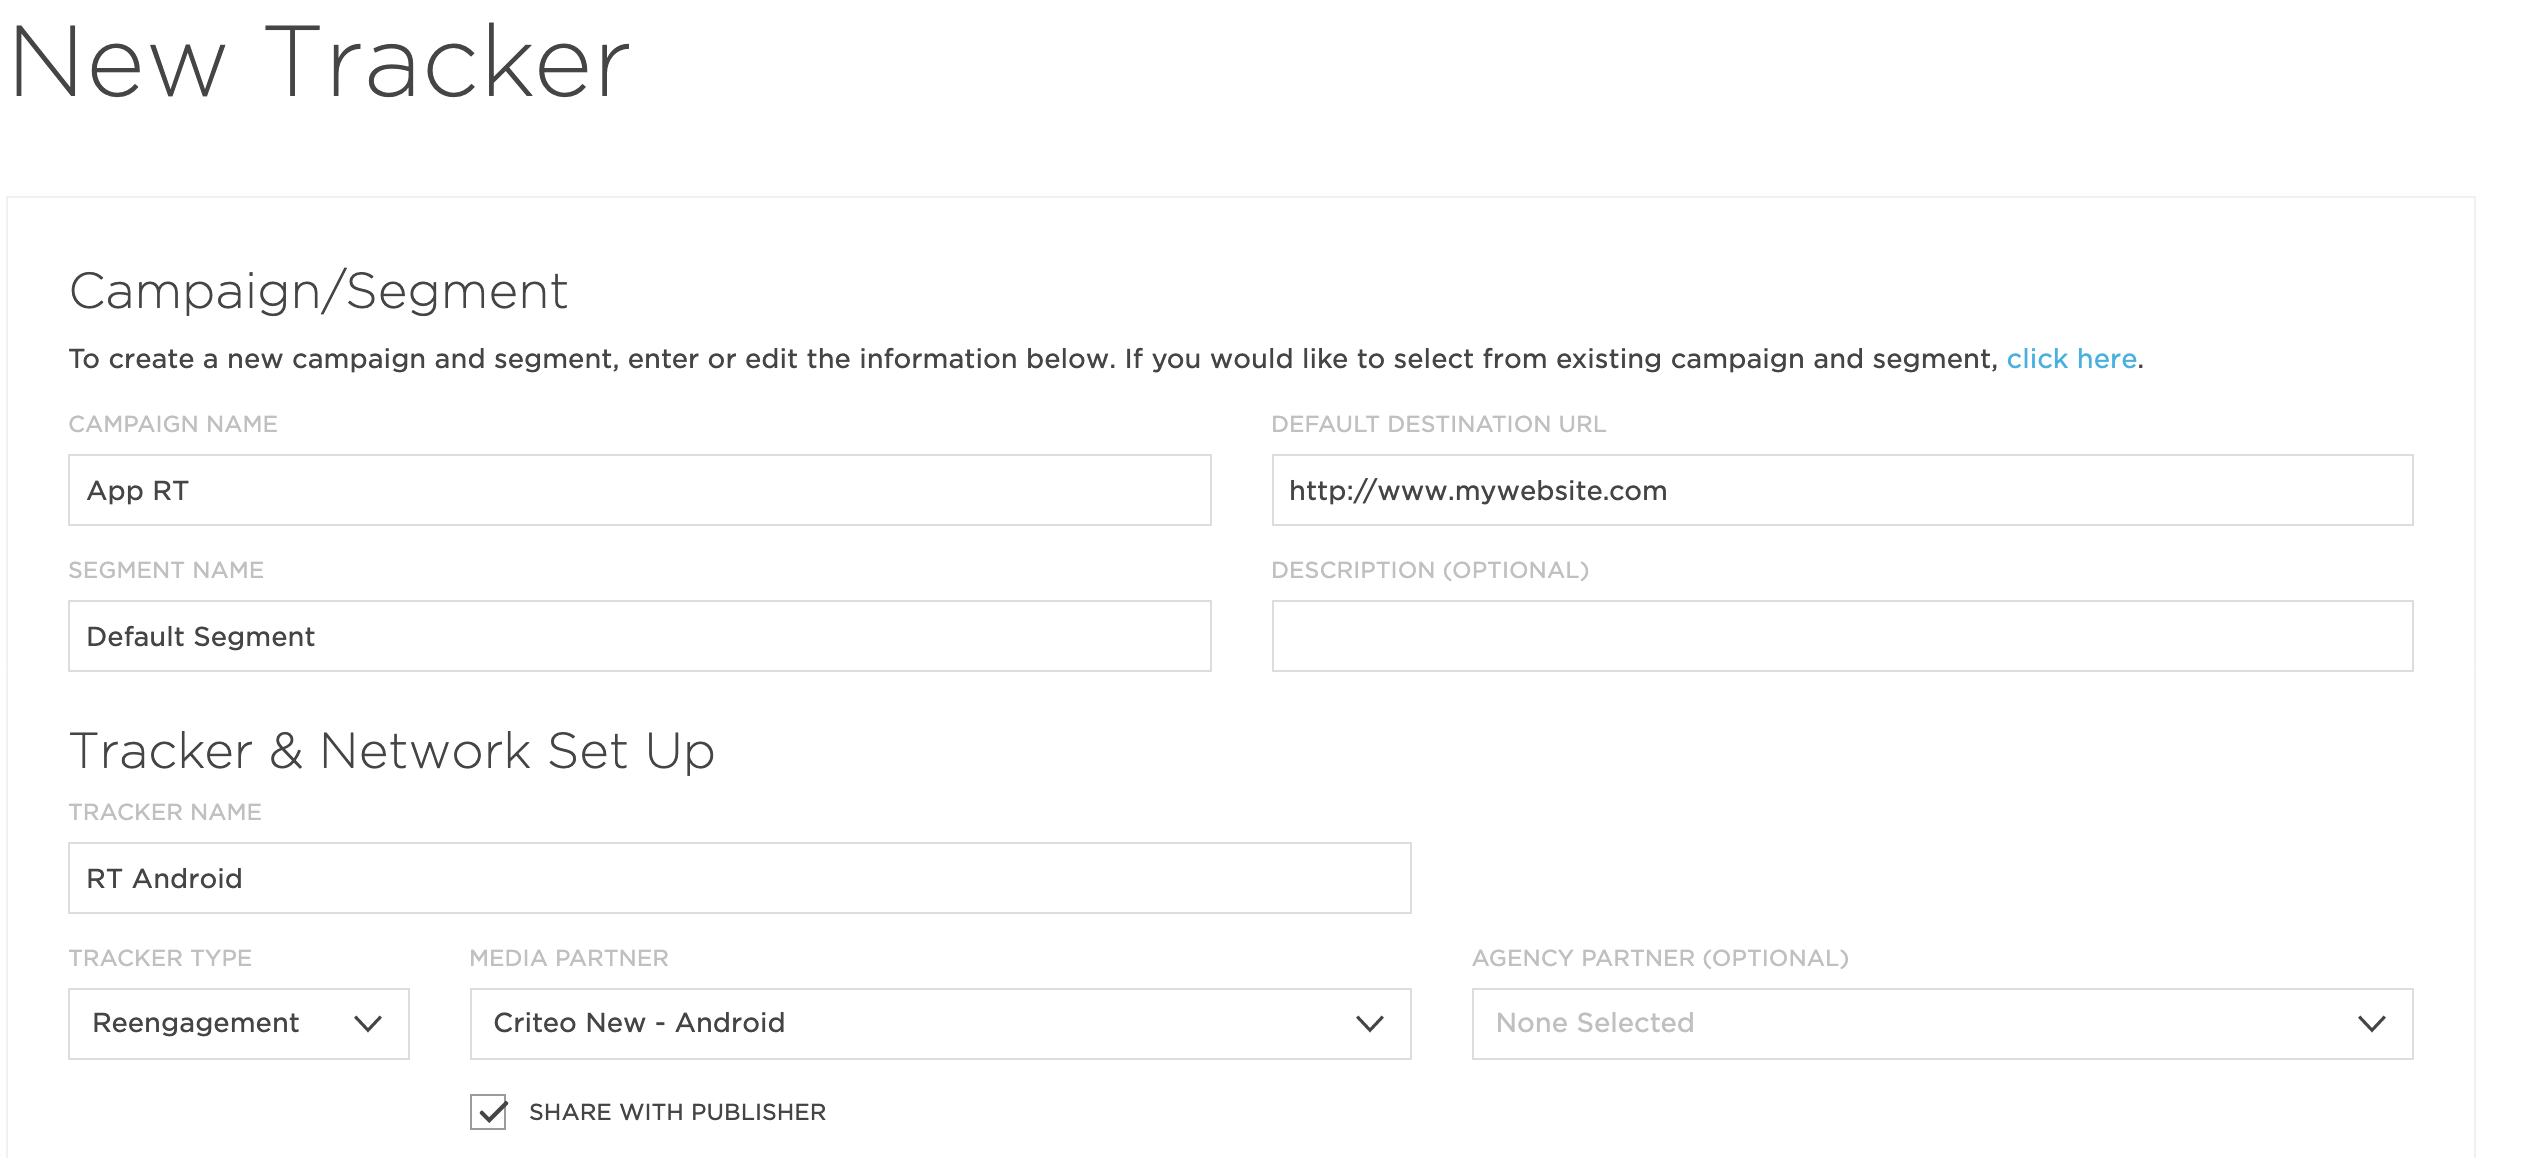
Set the tracking
Required:- Select Campaign
- Select Segment
- Set Tracker name
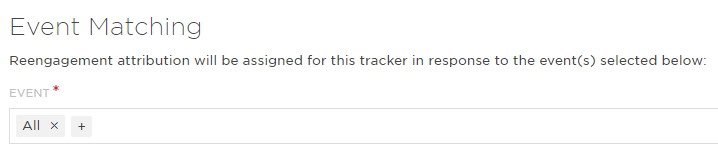
- Select Tracker type : Reengagement
- Select Criteo New - iOS.
- Important: all new integrations (and re-launches) must use the ‘Criteo New’ integration
- Check the box for *Share with publisher
- Set destination URL: Custom / Landing page / Google Referrer
- Select Event(s) for Reengagement: ‘All’ (if All is not selected and an event is not in the list, Criteo will not be able to effectively optimize toward the KPI event/s).
Optional: Agency
* utm parameters
* Custom parameters
* PricingSet a custom lookback window
- Tracker-level lookback windows can be set within Power Editor –> Tracker Overrides, however this is a paid feature of Kochava.
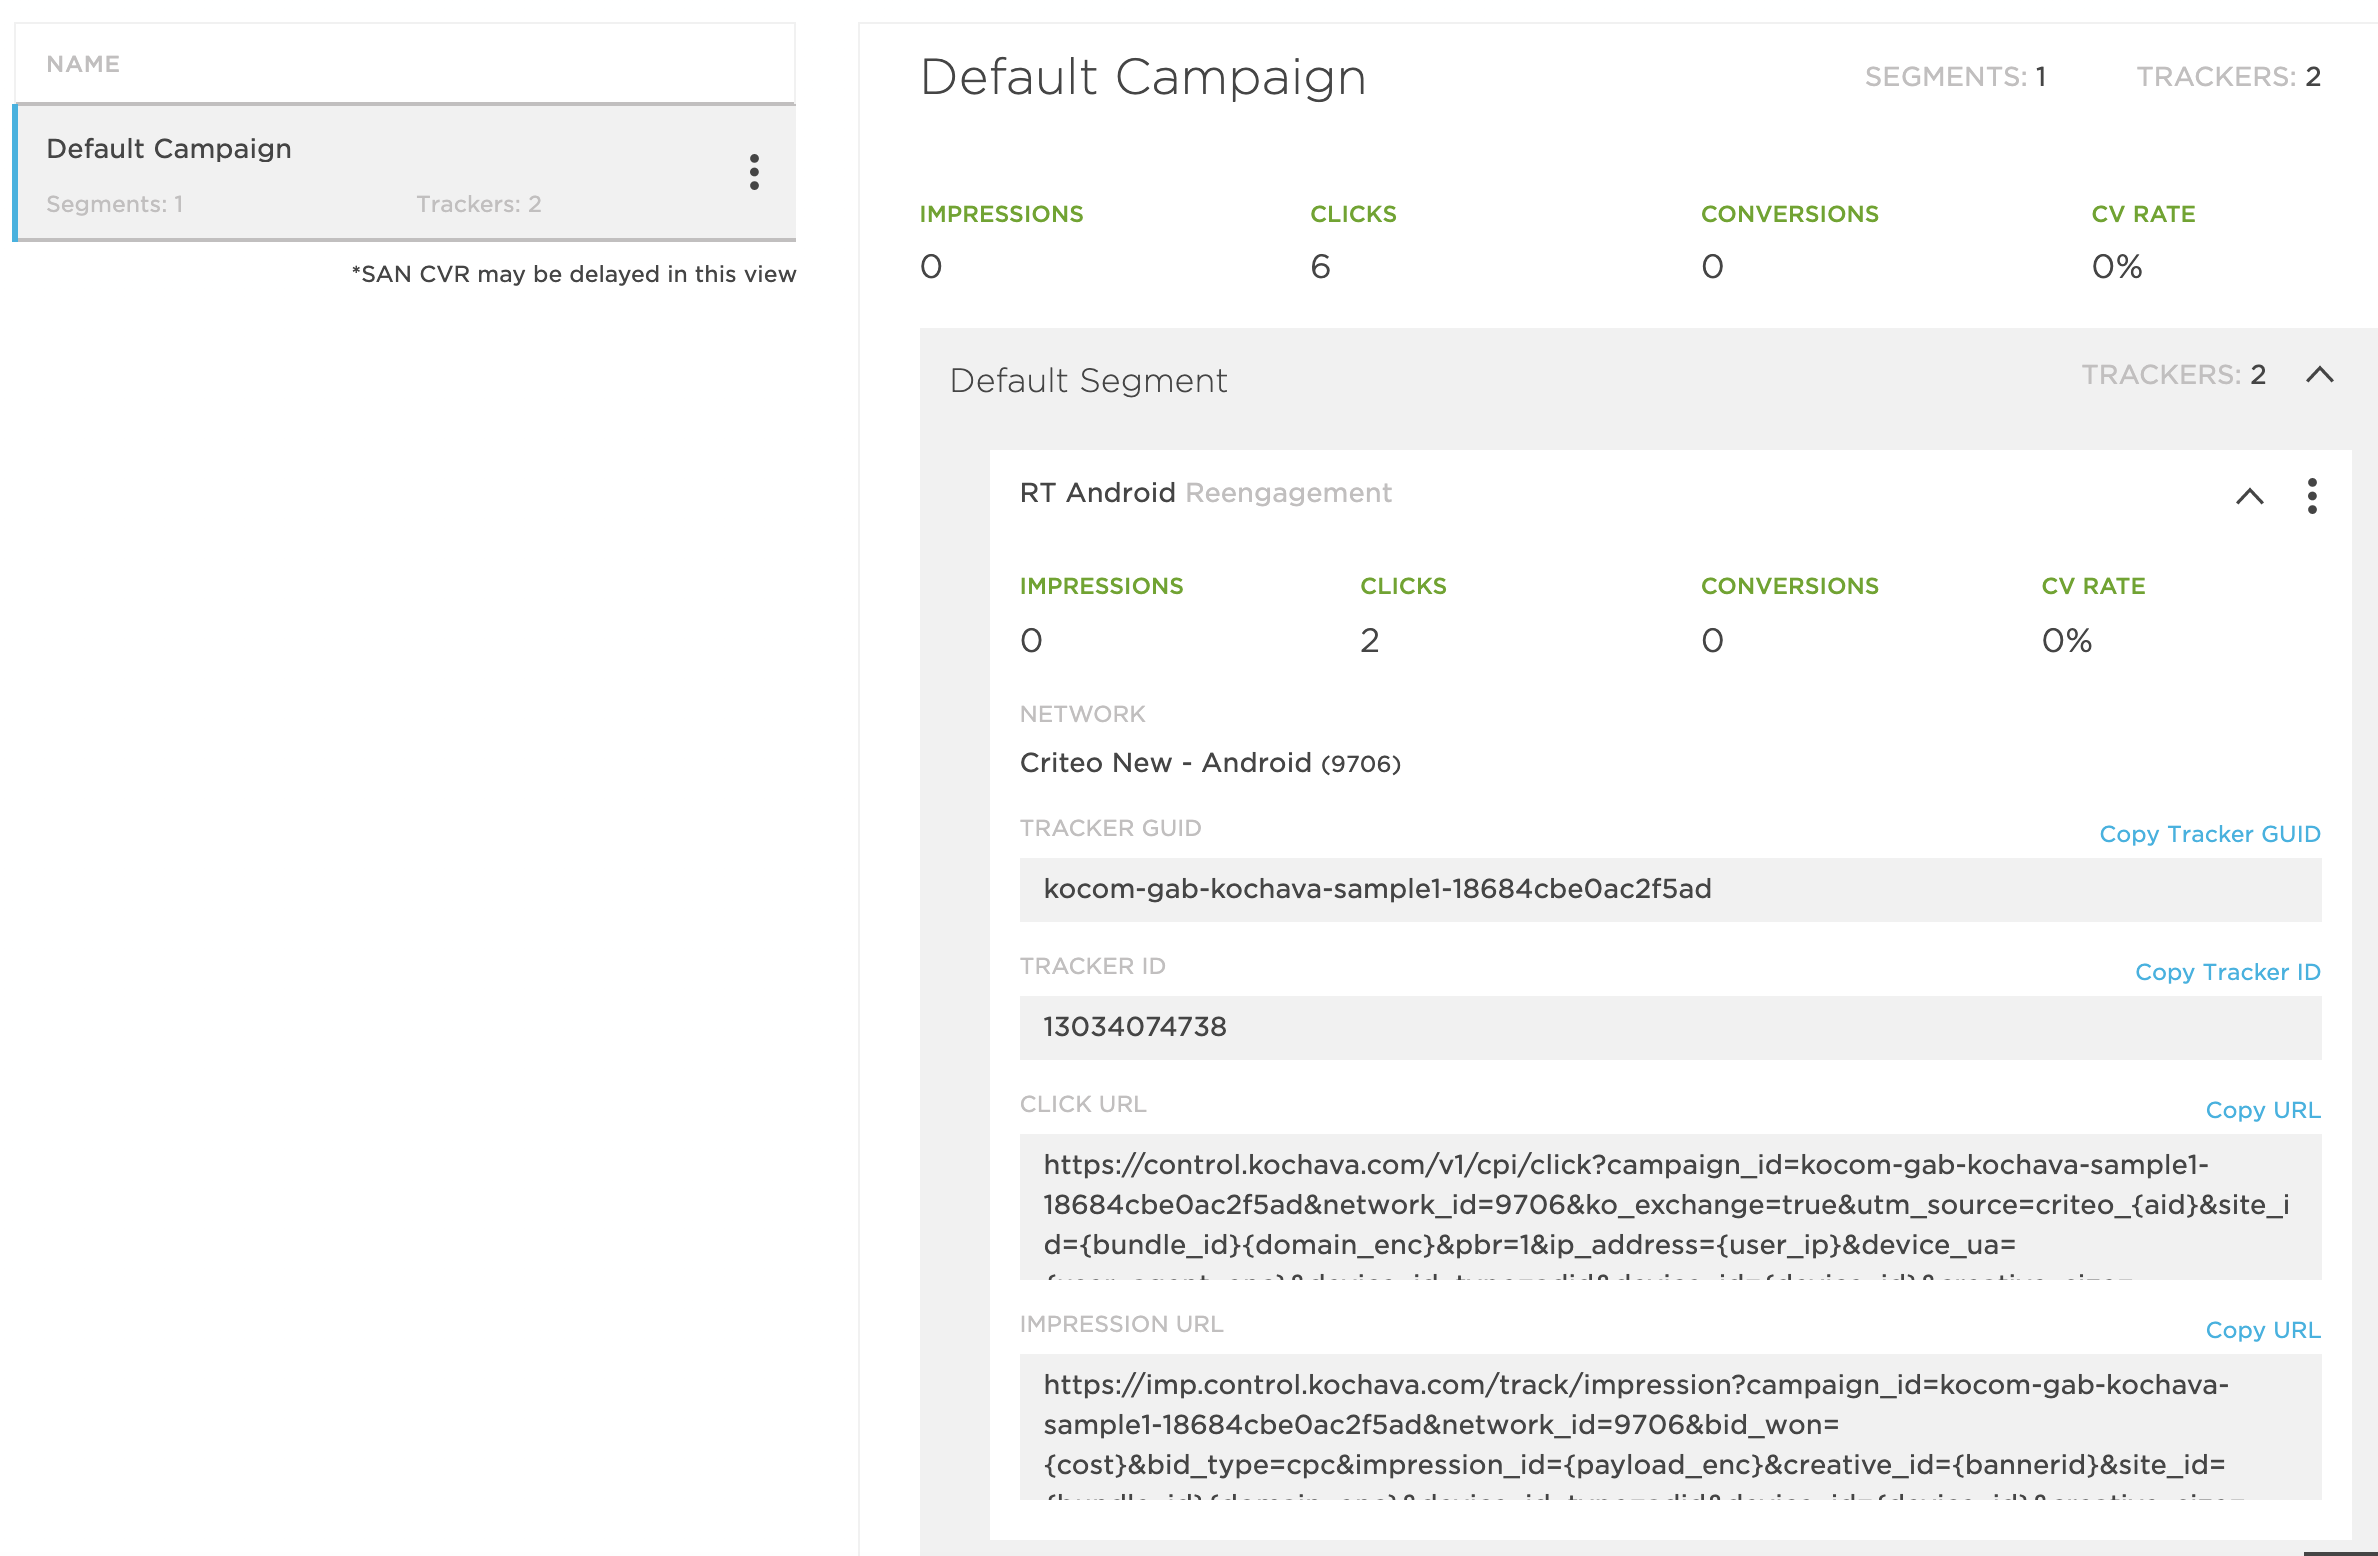
Copy Click URL and Impression URL and send to your Criteo contact
Catalog Feed
A catalog feed is an XML or a CSV file containing product information (name, price, deep link, image link…) that allows Criteo to dynamically generate product-level banners tailored to each user. Therefore, it is important to keep this file up to date in order for Criteo to show the right data in your banners.
The following points need to be kept in mind:
- Each product must have a unique ID that must be identical to the one passed in the events.
- The catalog feed must contain all or at least most of your apps’ products for Retail apps, and hotels/airline routes for Travel apps.
- Recommended image resolution is 300x300 pixels to 400x400 pixels.
Note: In some instances (i.e live campaigns on mobile web or desktop), Criteo will already have the catalog feed.
For more information, please request the dedicated guide from your contact.
Universal Links & Deeplinks
Deep linking consists of a hyperlink that links to a specific, generally searchable, or indexed piece of content on an App.
Criteo requires custom native deeplinks to run a App campaign utilizing dynamic creative. These deeplinks use a custom protocol (e.g. sampleadvertiser:// ) and, in most cases, optional parameters. The optional parameters may consist of a path and/or query parameters.
(e.g. sampleadvertiser://product/sku123 or sampleadvertiser://product?sku=123).
For iOS, we also strongly recommend Advertisers use Universal Links. For Universal Links, when users click a banner, they’ll be seamlessly redirected to your app without going through Safari. If the app isn’t installed, clicking the App banner will take them to your mobile website in Safari. For more information on Universal Links, please see Apple’s Supporting Universal Links article.
Criteo requires two kinds of Universal Links & custom native deeplinks:
- Opens to the homepage of the App.
- Opens to each product-details page.
Pass deep link events to Kochava using this method. After receiving the URI from your application via openURL:(NSURL *)url sourceApplication: in your application delegate, just pass the url and sourceApplication parameters to the sendDeepLink method. You can learn more about deep linking for iOS here.
Following is the sample code to capture and forward deeplink to Kochava:
-(BOOL)application:(UIApplication *)app openURL:(NSURL *)url sourceApplication:(nullable NSString *)sourceApplication annotation:(nonnull id)annotation {
    [KochavaTracker.shared sendDeepLinkWithOpenURL:url sourceApplicationString:sourceApplication];

    return YES;
}
Note that you will also need to register your URL scheme. Information can be found here.
Testing process
Once all events and postbacks have been implemented, you should contact your Criteo representative to begin the testing phase.
Criteo requires the following elements:
- App build to test the collection of events on Criteo side.
- If testing remotely, the IDFA of the test device.
- (For Retargeting) Deeplink and Universal Link examples - homepage & product details page.